This section describes in sufficient detail the process of configuring providers for sending messages.
Read the instructions carefully and check the screenshots.
Use the icons below to quickly navigate through the guides of various social networks.
Getting social networks Authentication tokens can be a little tricky.Please note that the plugin cannot affect this.
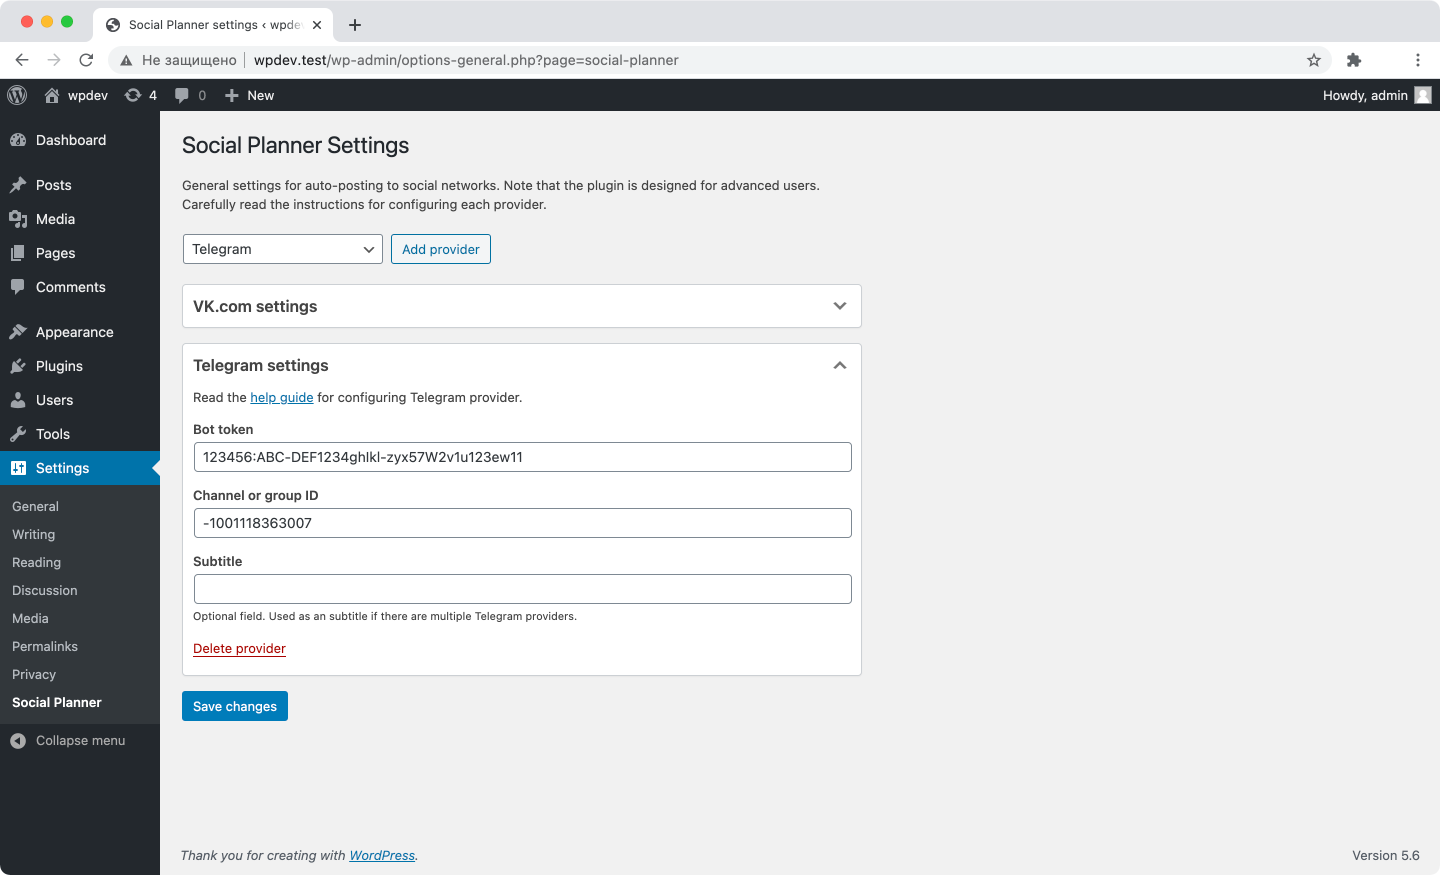
You can send messages to any group or channel.
To do this, you need to create and add a special Bot to the required chat with the ability to send
messages.
Write to the @BotFather in Telegram and create a
new Bot.
Follow the bot prompts, fill in all required fields and get an API Token.
Then you need to find out the group or channel ID.
If the chat has a public link, then you can use its username (in the
format @channelusername).
Otherwise you can write the message to @username_to_id_bot or use this guide.
Note that chat ID can be negative.
Example settings for Telegram.
If you have an access error when sending a message, try to check the correctness of the API Token and
the chat ID,
bypassing the plugin.
You can find full help on Telegram Bot API on the official website.
With this plugin you can publish to Facebook Pages only.
If you already have an application with permissions to publish to your page,
you can immediately proceed to the stage of obtaining the Page ID.
Attention! Due to Facebook Restriction we can use the new Facebook App in HTTPS sites
only.
Attention! You can publish to Facebook with the approved app only.
So you need to submit the app for approval and it may take upto 3 months to get the approval.
Facebook changes the rules of using its products often, so before starting the setup,
read the latest guidelines on the help page.
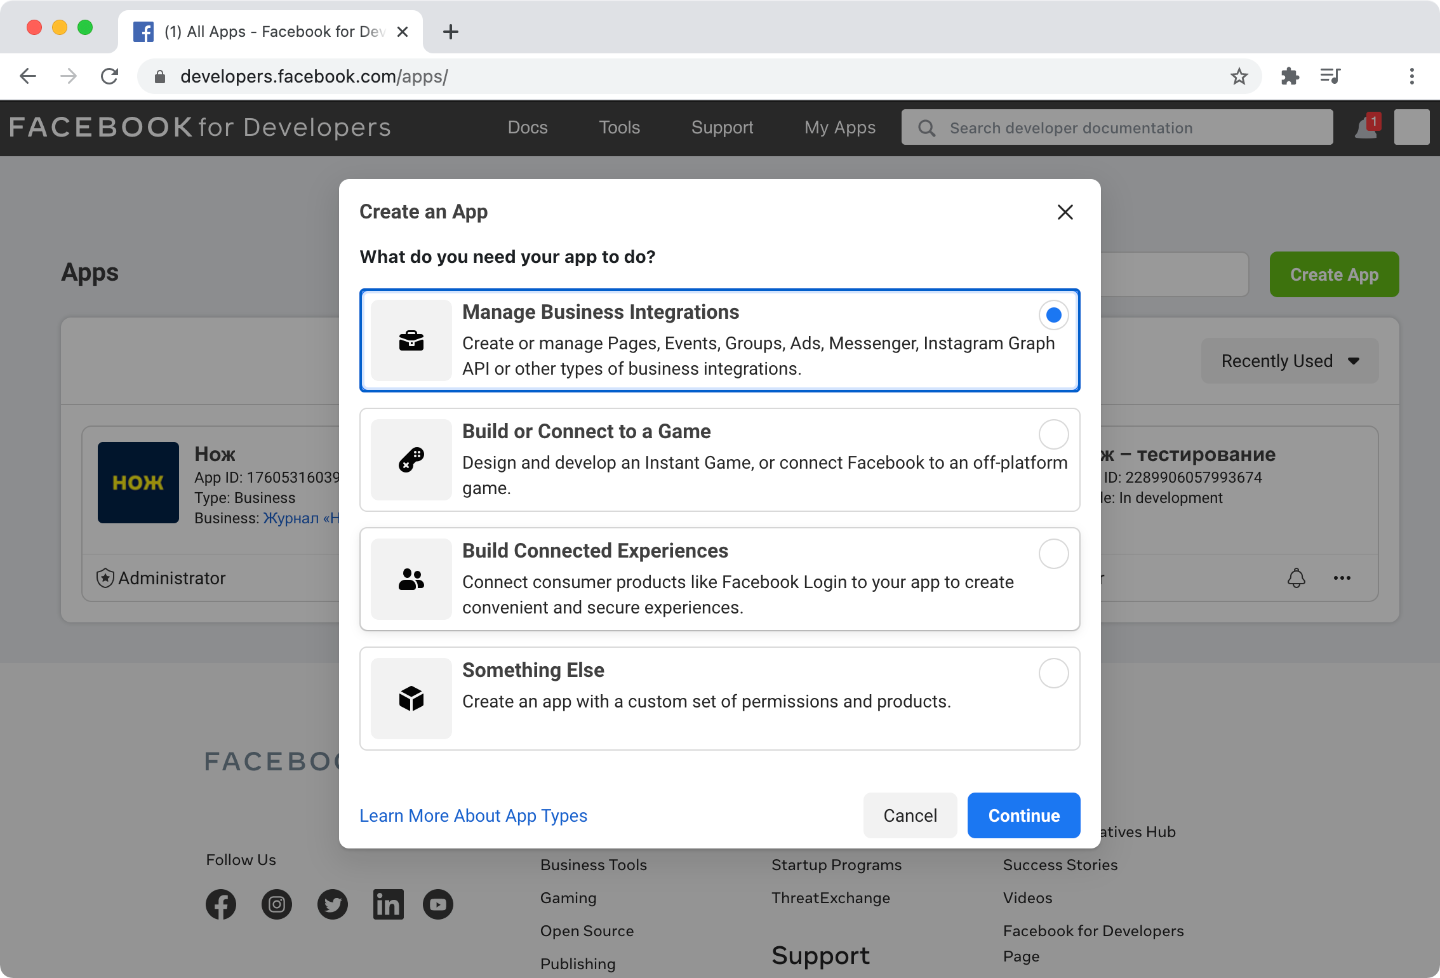
To create a new Facebook application, go to the developer pages
and create new one. You will need to select the type of your application.
The easiest way to focus on Business integrations.
Enter the App Display Name and the contact Email. The purpose is for Yourself or your own
business.
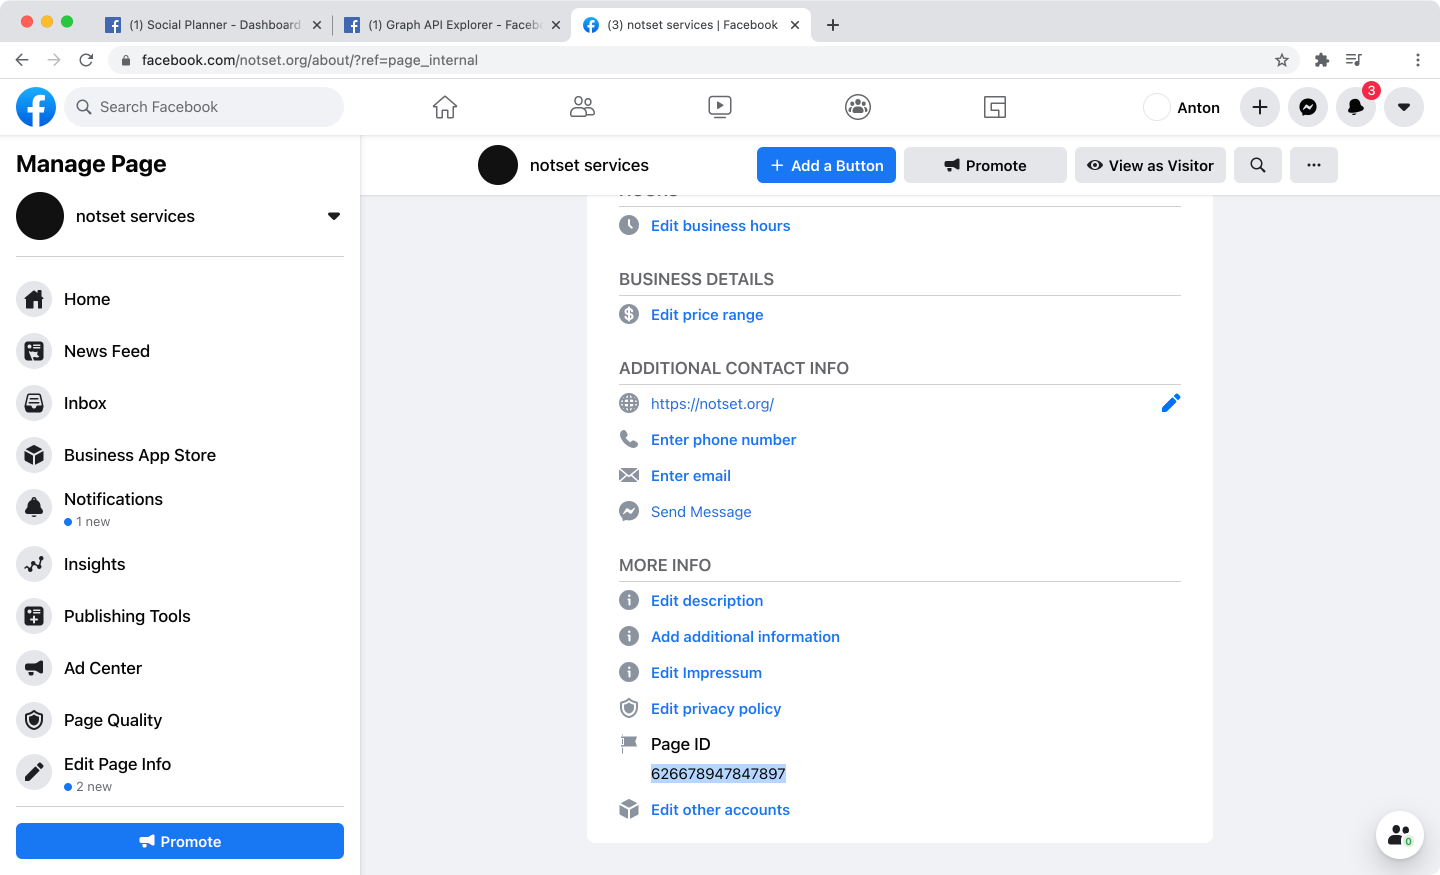
After the application is created, let's find out the ID of your page.
Read how to do it on the Facebook help page.
This is how the Page ID usually looks.
Now let's move on getting access token.
For this you can use Graph API
Explorer tool.
In the right section select your Facebook App and in the User or Page field click Get page
access token.
Now you need to request some required permissions:
pages_manage_metadata
pages_manage_posts
pages_manage_read_engagement
pages_show_list
Ideally you should see something like this for your app and page.
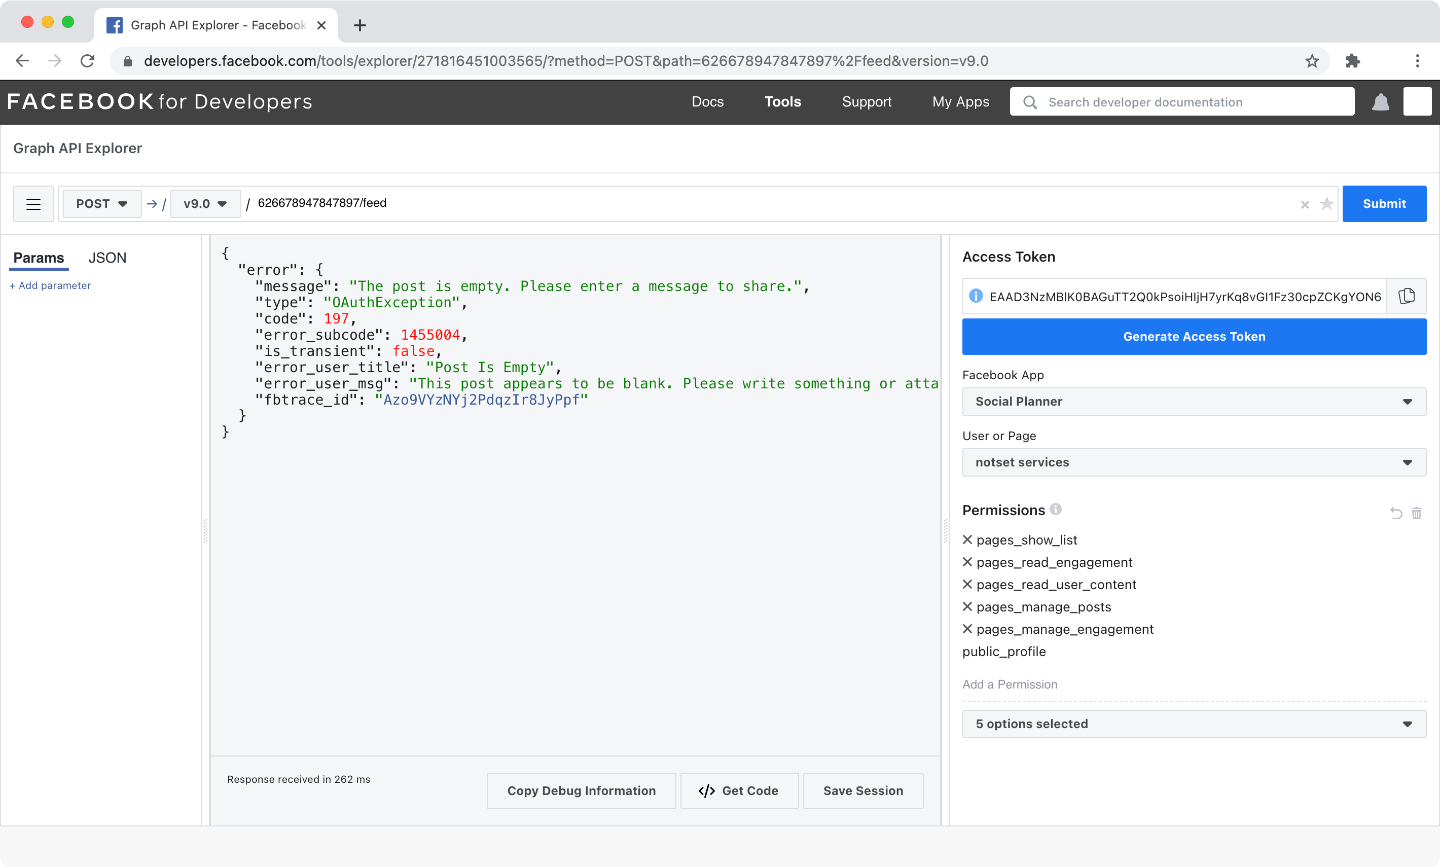
Check that the access token is working by sending a POST request in the Graph Explorer
tool of the
{PageID}/feed.
Error The post is empty. Please enter a message to share means that the token is
correct.
If the error says about the need to obtain additional permissions, then you will have to pass the
application verification.
You can read more about this in the Facebook help guide.
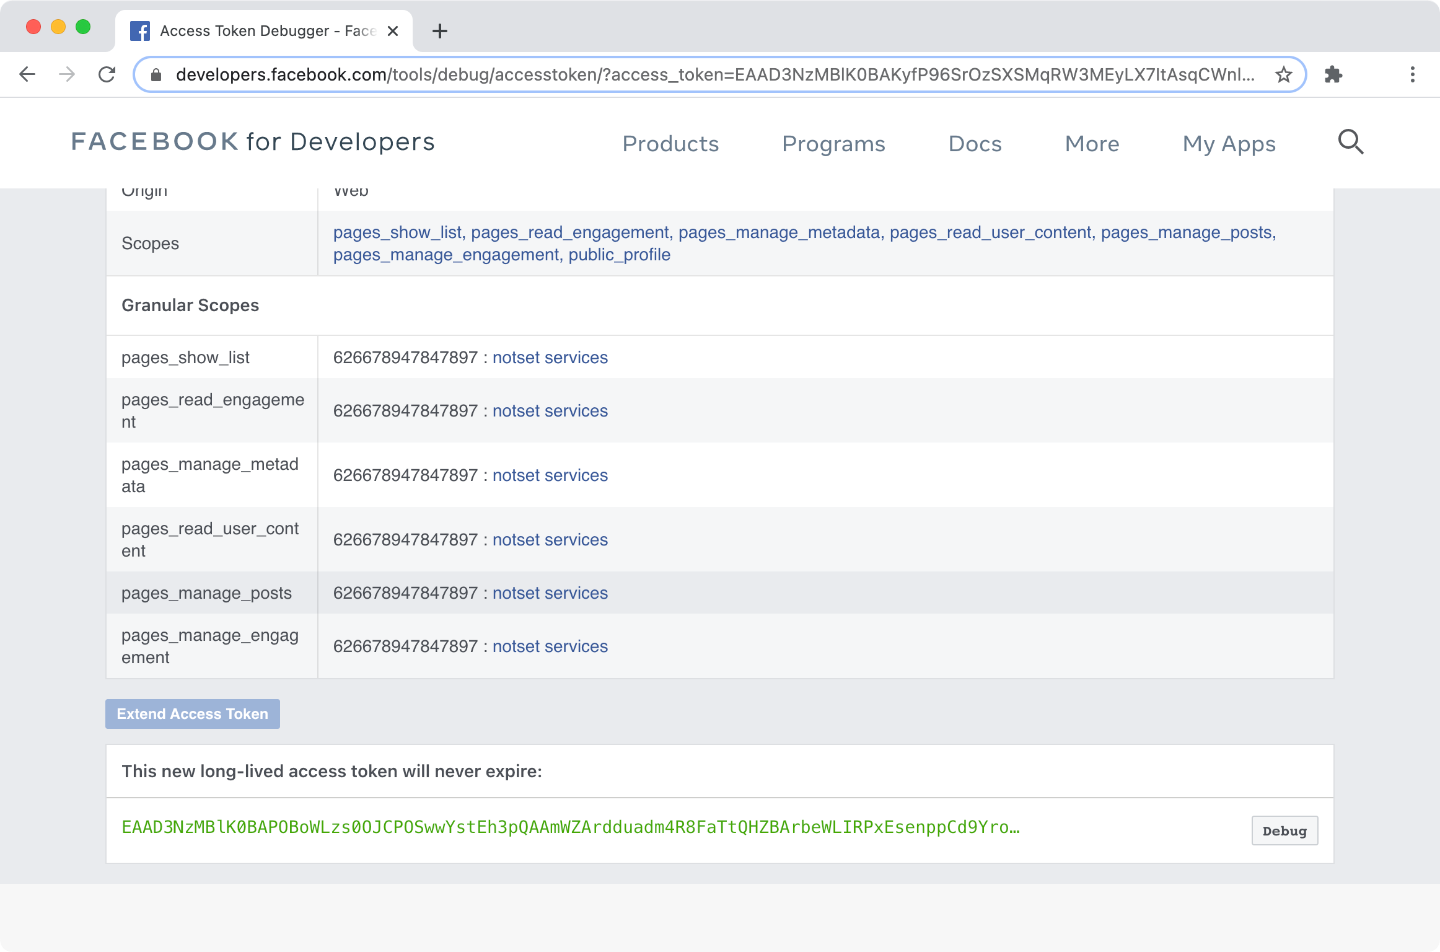
The received token must be made long-term with Access Token Debuger.
You can also get a permanent token using this guide.
Receiving permanent token in Access Token Debugger.
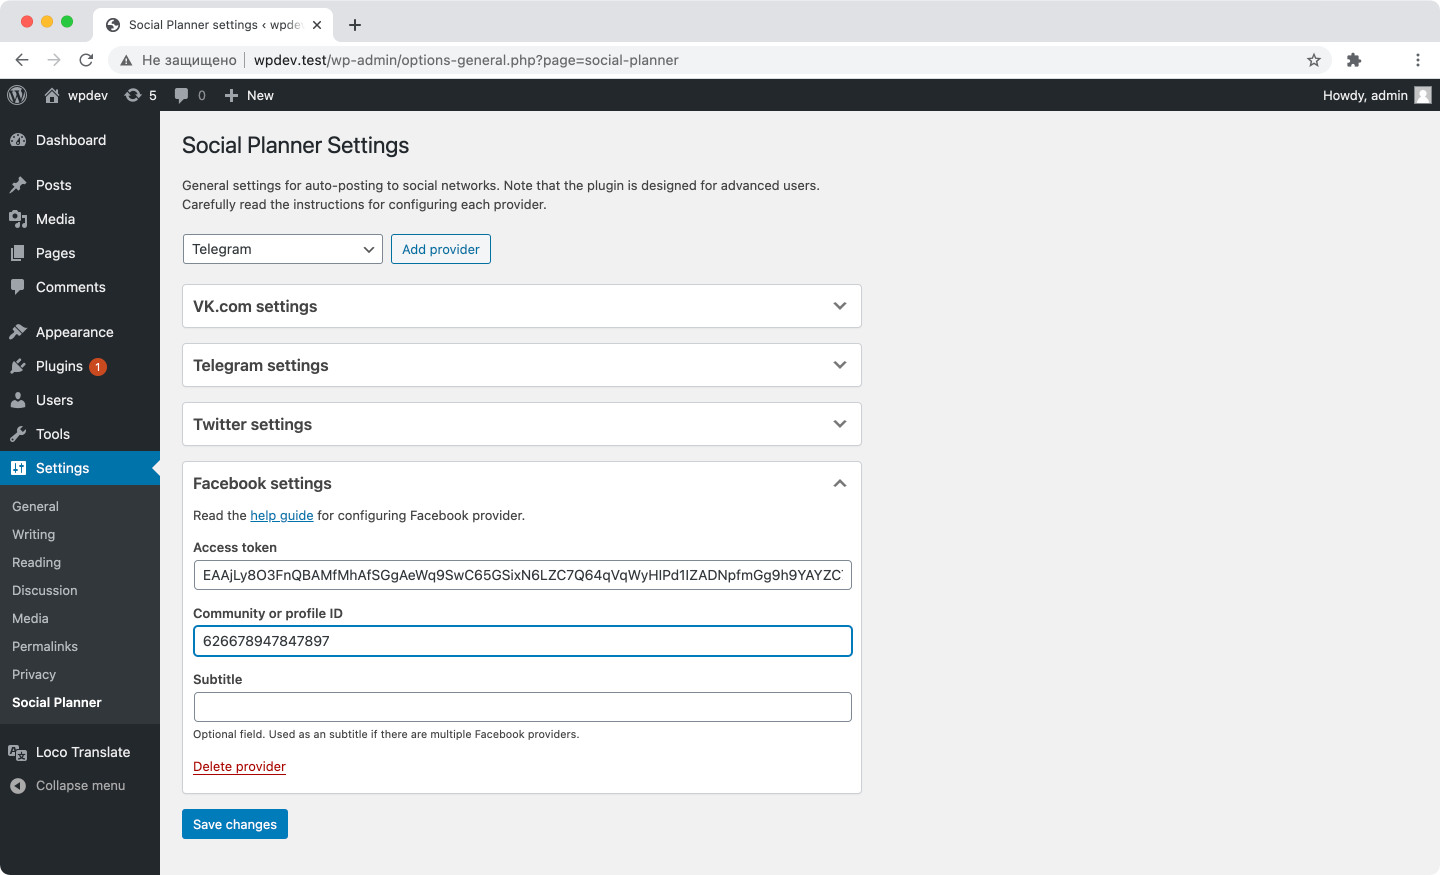
After receiving the access token and Page ID, you can proceed to
configuring the plugin.
You can send messages both to your profile wall and to the community where you are an administrator.
Start by registering your app on the developer page.
Enter something in the title field and choose Standalone app platform.
Then confirm your action with phone call or push notification.
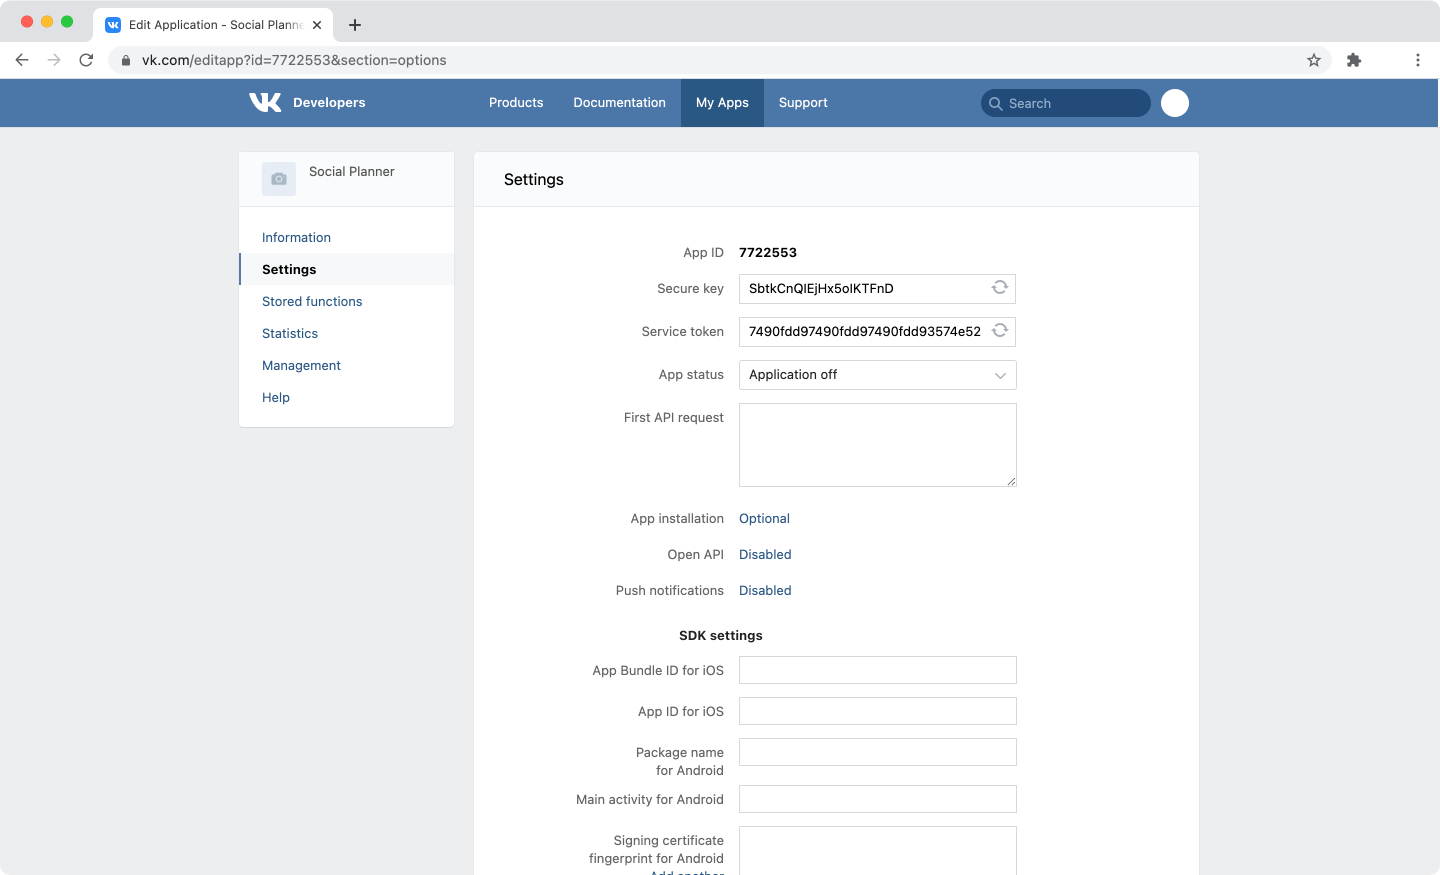
Go to the Settings tab and copy the App ID.
Insert this ID to the field below and push the button to generate your Token.
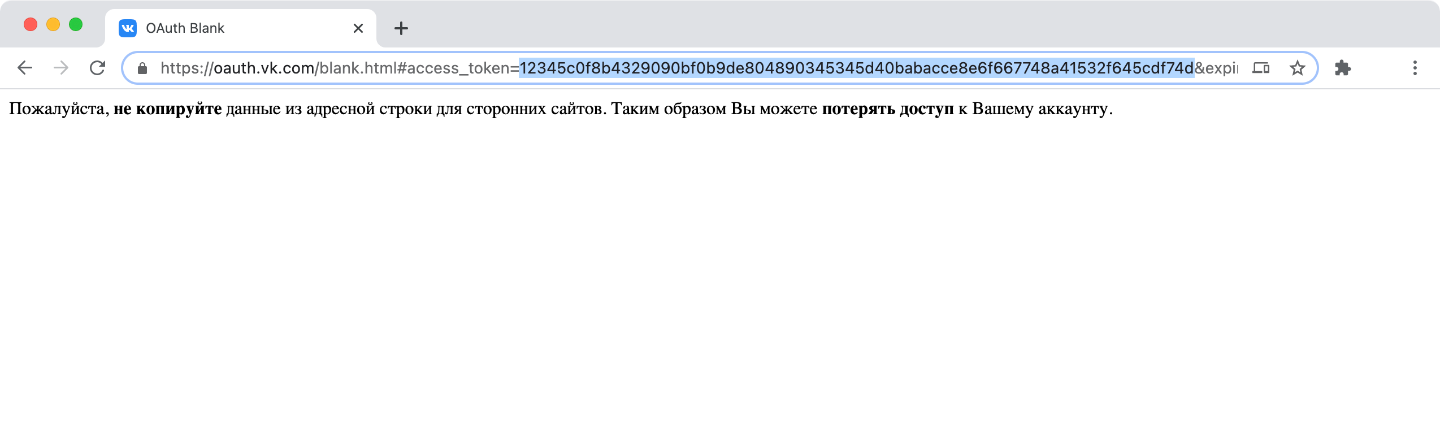
After you agree to the terms and conditions, the page will be redirected to oauth.vk.com
domain.
Your Token will be in access_token parameter.
Please note that VK.com warns you not to transfer the Token to other sites.
So keep it secret and only use it on trusted sites.
Social Planner does not send any user data to remote servers.
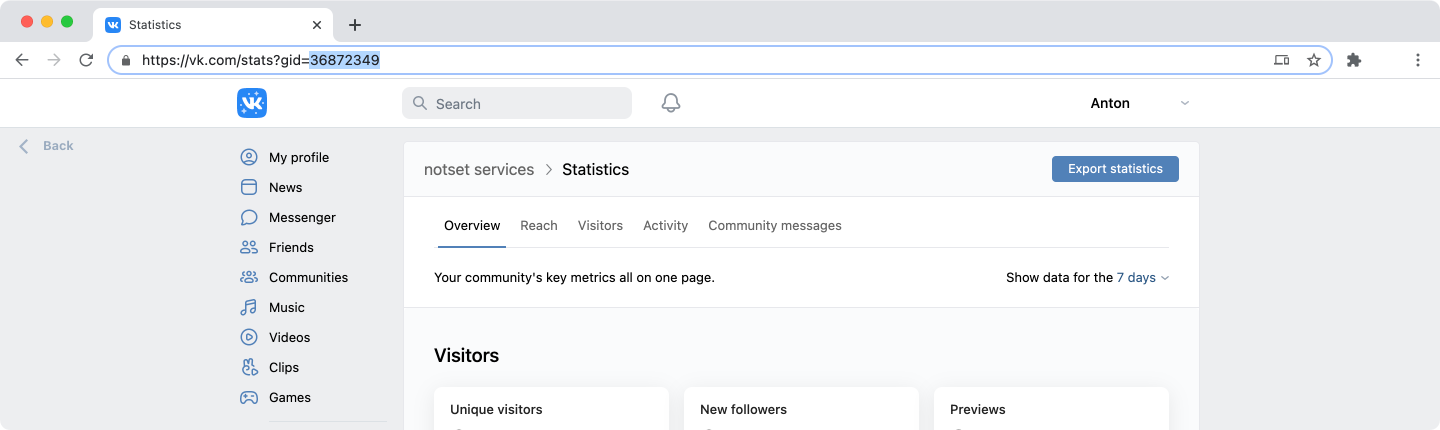
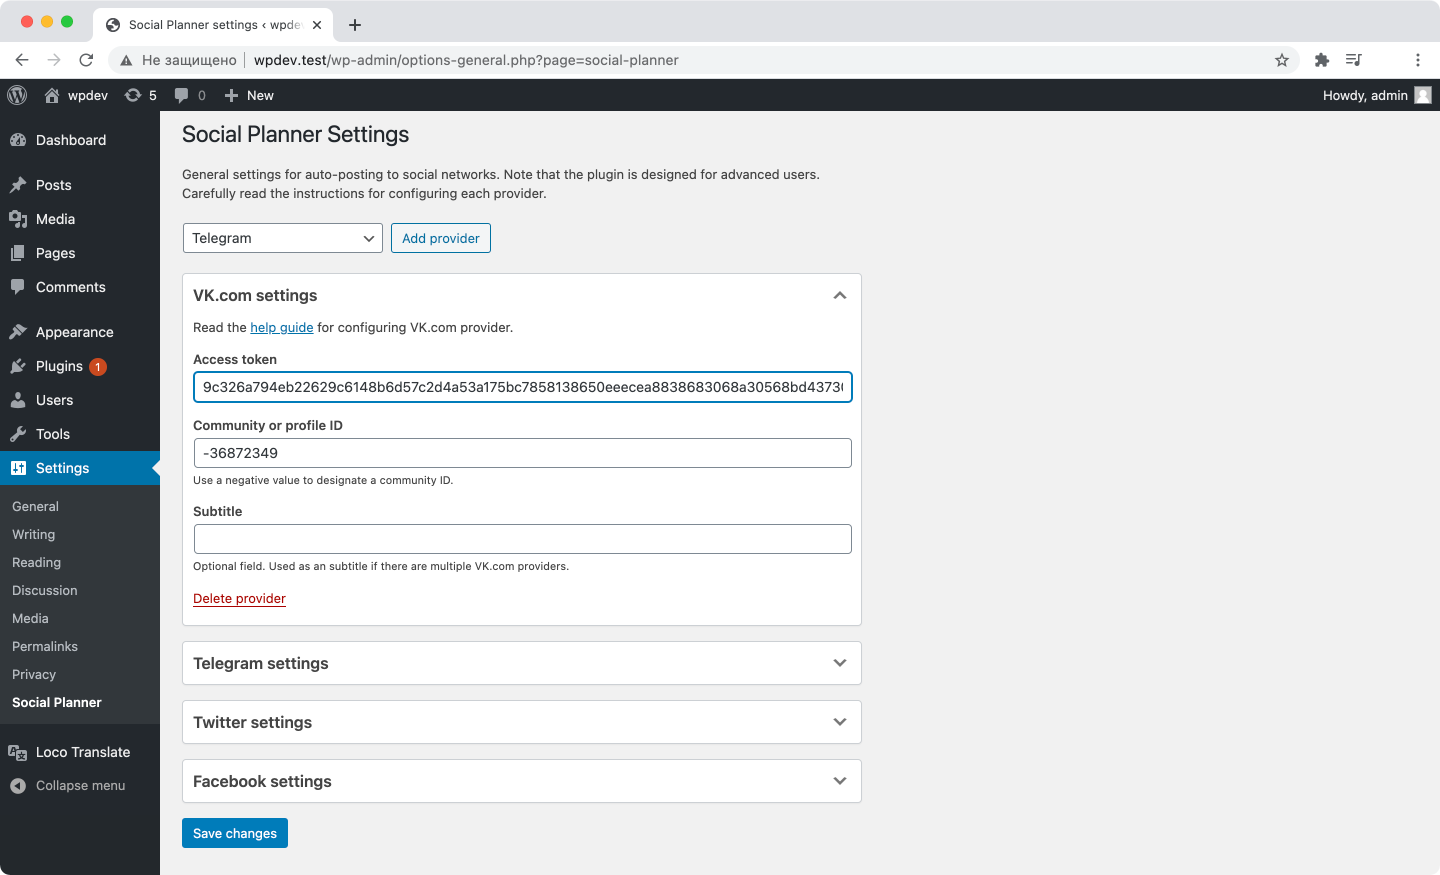
Now you need to get the profile or community ID.
You can find it in the links of your pages. Use a negative value to designate a community ID.
For profile page, use value without minus.
You can see the ID in the url on the stats page for example.
Use access token and group ID on the plugin settings page.
To set up this provider, you should create the developer Twitter account.
If you already have it and you created the application earlier,
then skip directly to the last step.
Attention! For new developer accounts only Twitter API v2 availible.
Attention! The following steps assume that you have just created your developer account.
Log in to Twitter Developers
and click on the Developer Portal header menu button. Start with a free account to get started.
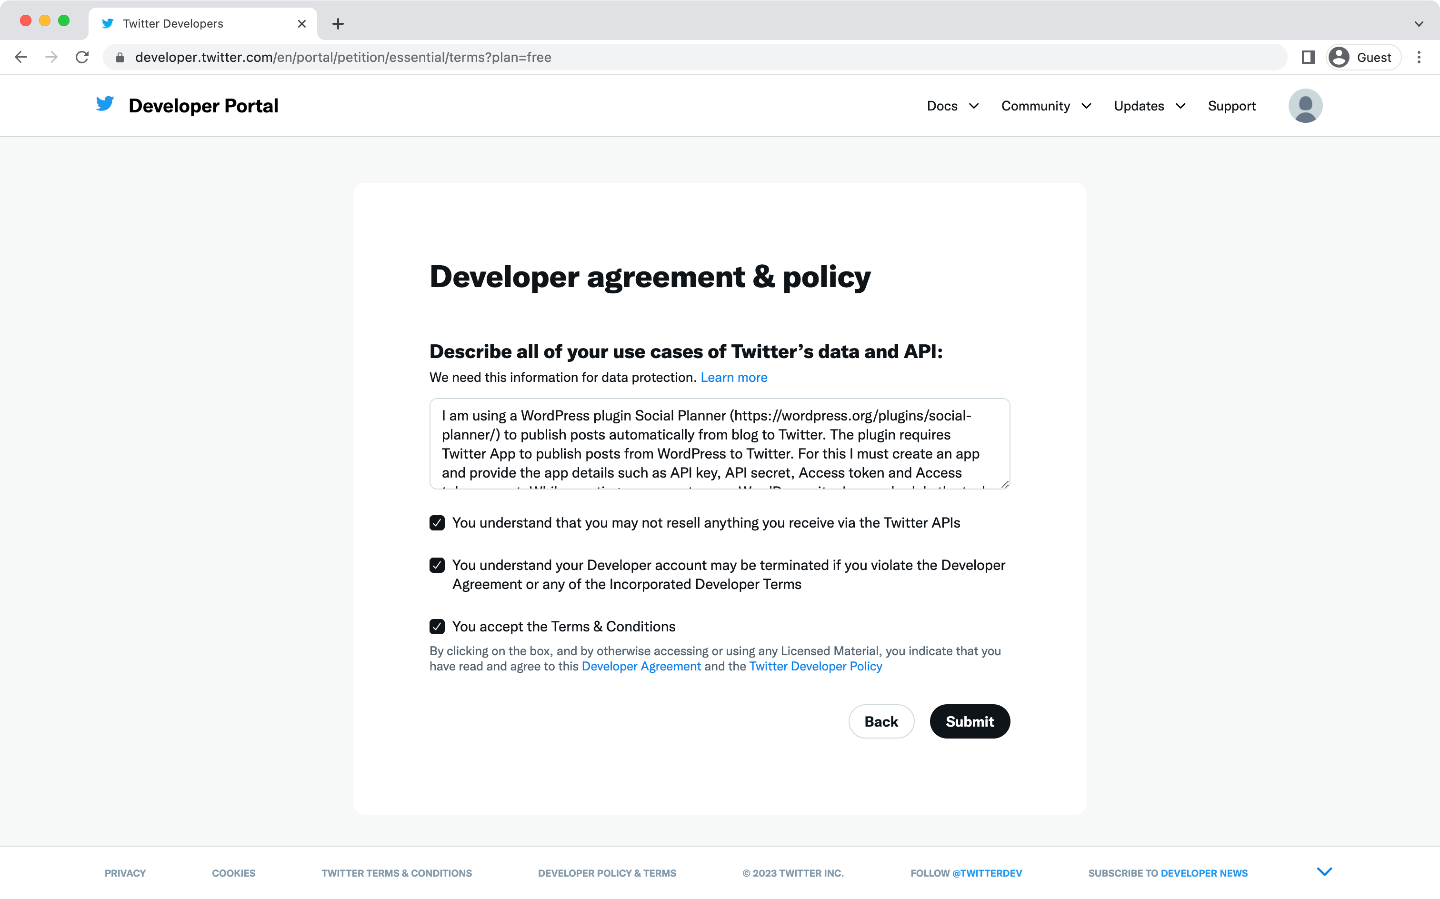
Now you need to fill out a form to obtain developer status.
Fill in all fields and checkboxes and submit. Try to describe in as much detail how you will use the keys and on which specific site.
A sample description is given below.
I am using a WordPress plugin Social Planner (https://wordpress.org/plugins/social-planner/) to
publish posts automatically from blog to Twitter.
The plugin requires Twitter App to publish posts from WordPress to Twitter.
For this I must create an app and provide the app details such as API key, API secret, Access token
and Access token secret.
While creating a new post on my WordPress site, I can schedule the task to send this post to Twitter
with custom excerpt or image.
The detailed process is described in the documentation for the plugin
(https://wpset.org/social-planner/#task-scheduling).
Accept terms and conditions and submit the application.
Once the developer account is created you get new project and application.
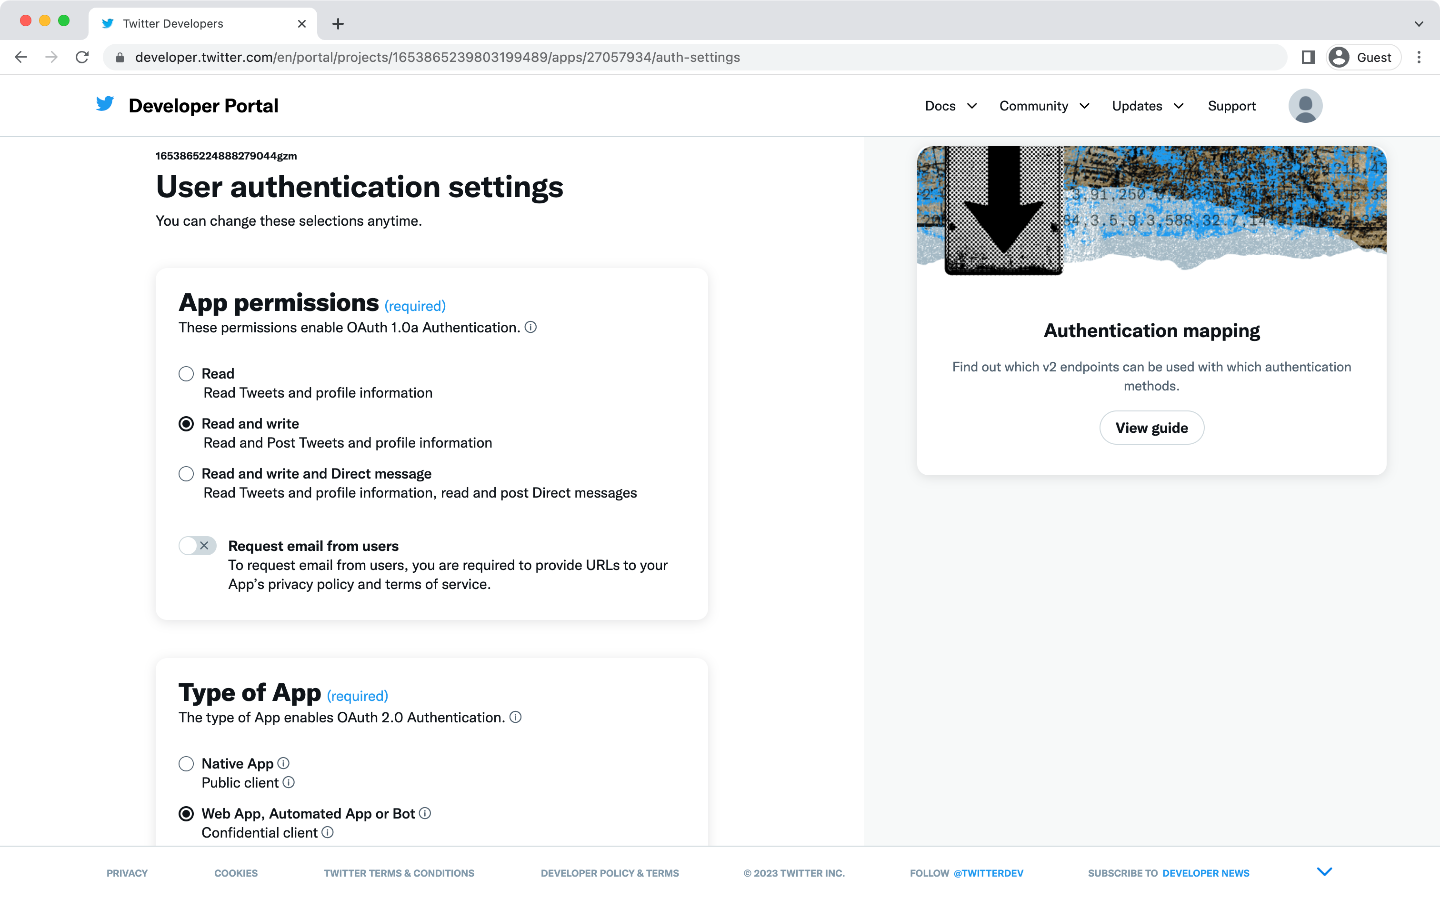
Now you should set up User authentication settings.
Choose at lease Read and write permissions, set any type of application.
Use your website url in App info section. These options do not affect the operation of the plugin.
You do not need OAuth 2.0 Client ID and Client Secret.
Set up user authentication.
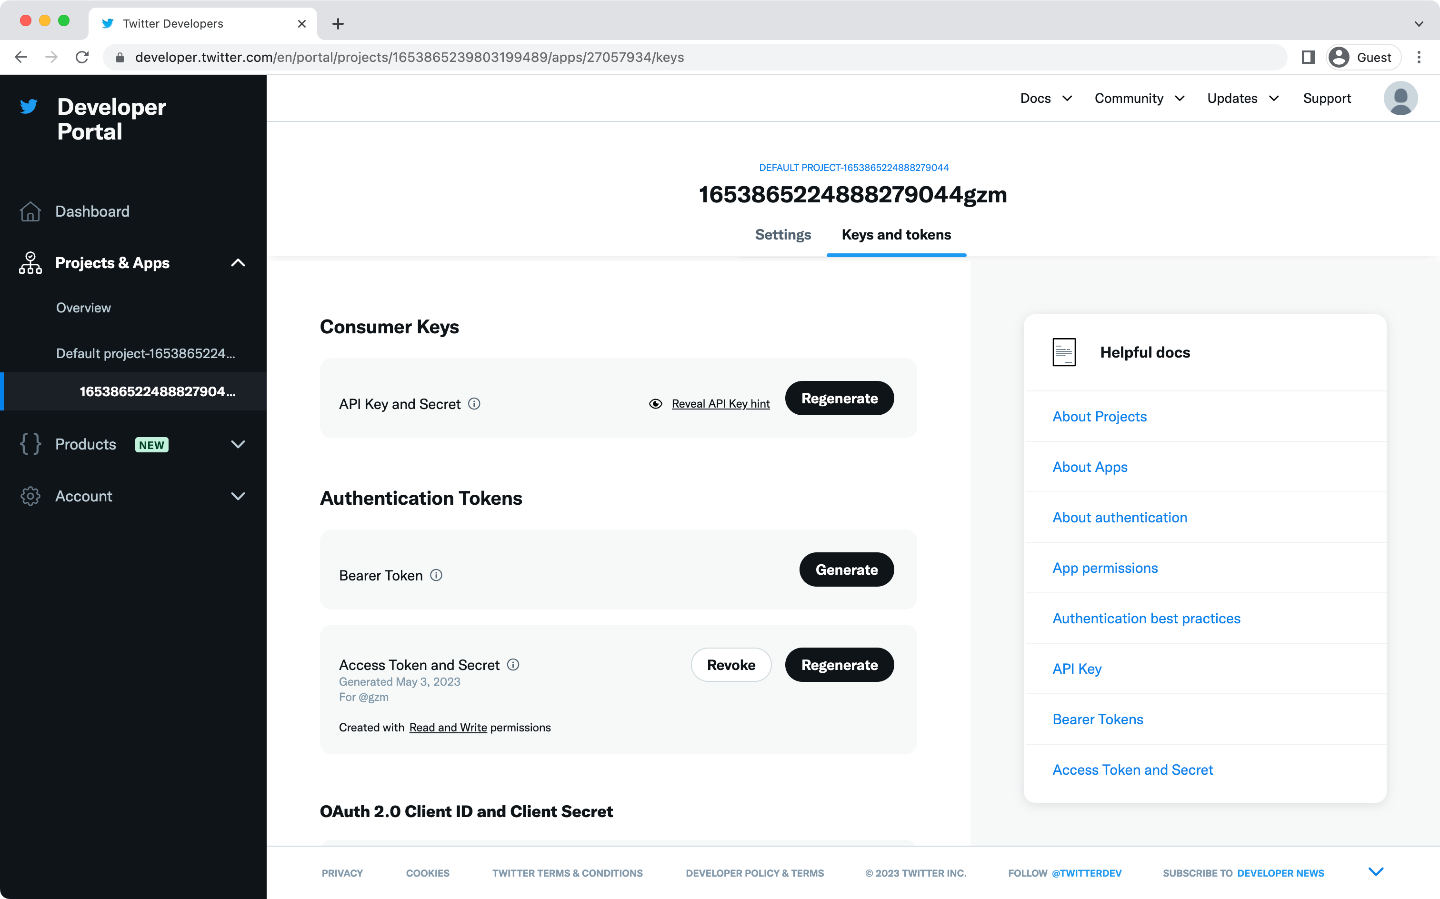
Navigate to Keys and tokens page and generate Consumer Keys and Access Token, Secret.
Check that you app has Read and Write permissions.
Generate requred keys.
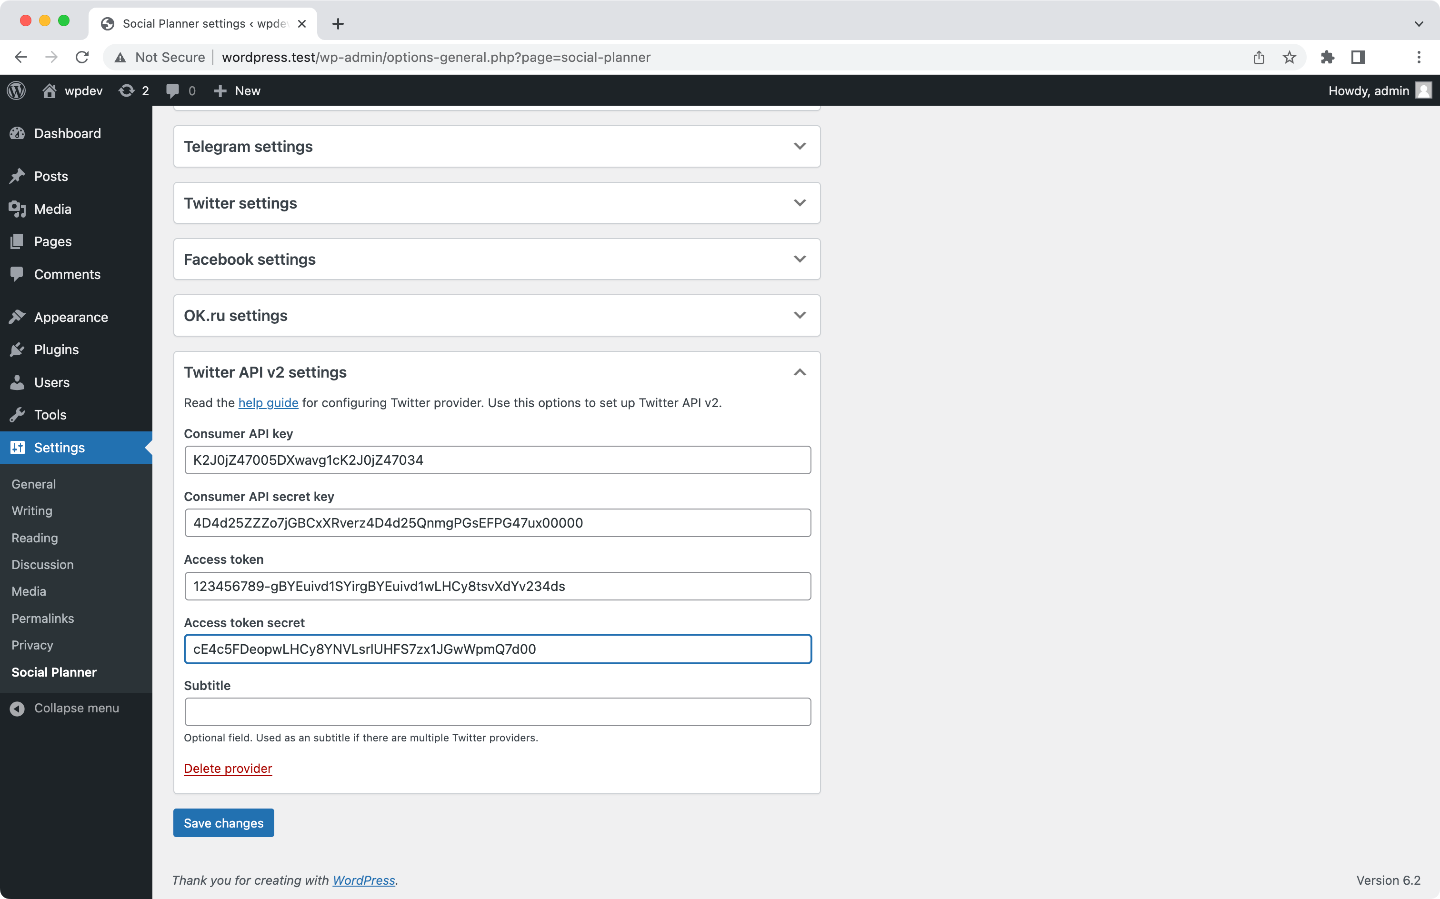
Now you can use the received keys to configure the plugin.
You need to Consumer Key and Consumer Secret, Access Token and Access secret.
Fields order on the settings page is the same as the order in Twitter.
Use Twitter API v2 provider if you followed the steps above.
With this plugin you can publish to OK.ru groups only.
If you already have an application with permissions to publish to your group,
you can immediately proceed to the configuring the plugin.
Attention! You can publish to OK.ru groups with the approved app only.
So you need to submit the app for approval and request the necessary permissions.
This process usually takes 3 days, but the time frame may increase.
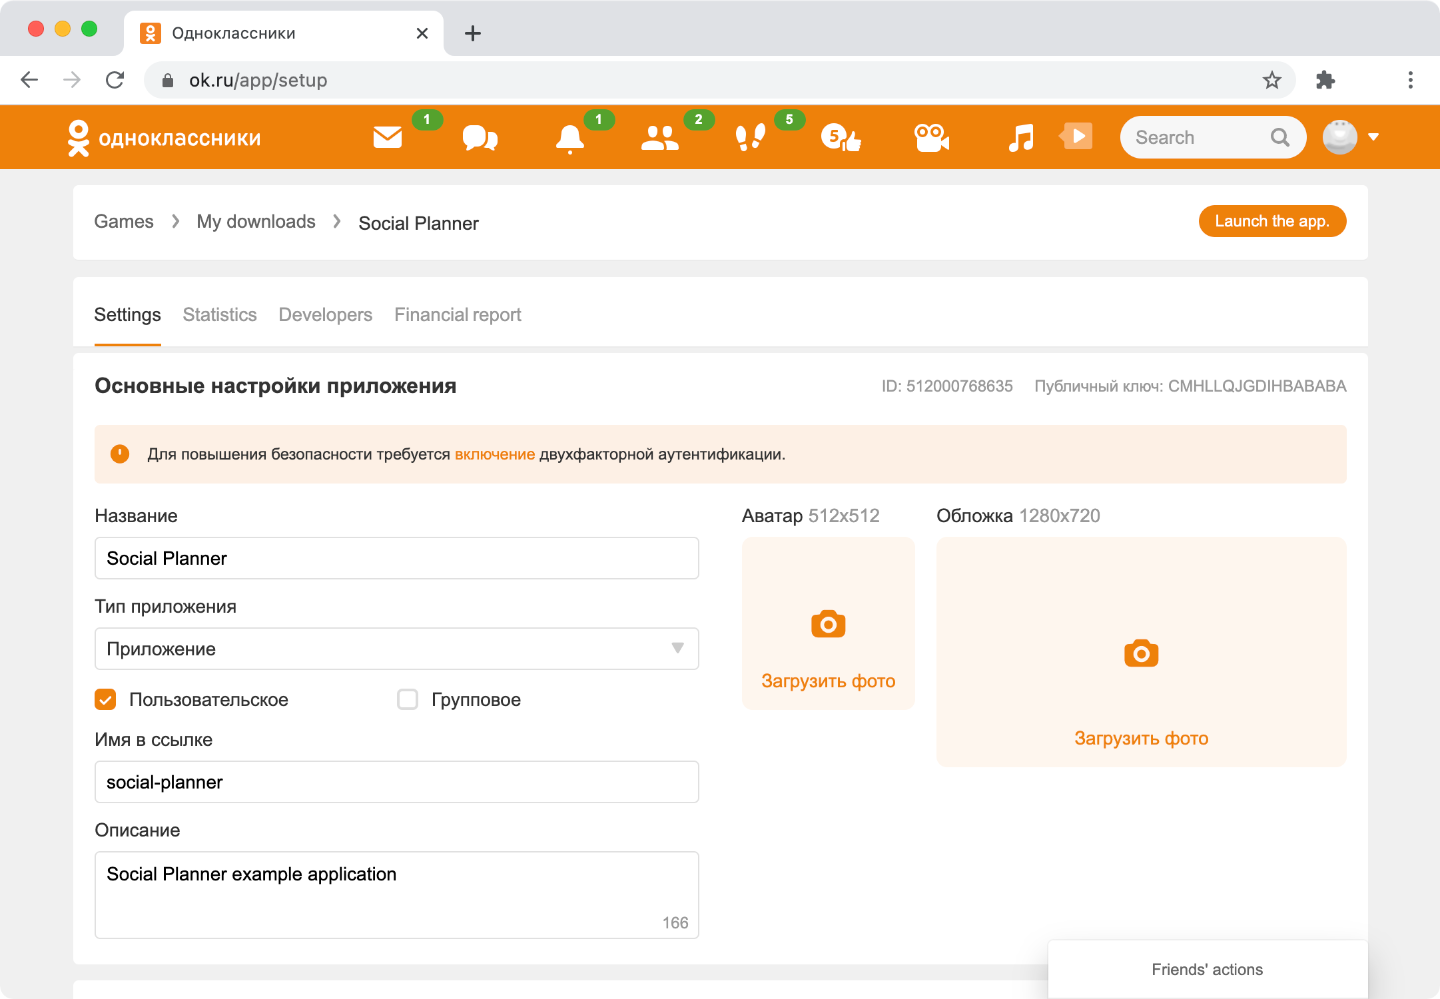
Log in to OK.ru and go to the development page
for creating a new application.
Fill in the settings fields. Select the type-custom application and save it.
Immediately after that, a letter should come to your mail indicating your application credentials.
Do not forget to fill in all the required fields and save the application settings.
Now you need to request additional permissions for your app in order to be able to post.
To do this, send an email to api-support@ok.ru with the ID of your application
and a detailed description of the tasks for which you need permissions.
A sample description is given below. Do not forget to replace values in brackets.
Здравствуйте, прошу предоставить разрешения на создание топиков в моем сообществе в Одноклассниках
[link to your group]
для моего приложения с ID [application ID from email].
Публикация будет выполняться с моего сайта [link to your WordPress site]
с помощью плагина Social Planner: https://wordpress.org/plugins/social-planner.
Требуемые разрешения: GROUP_CONTENT, PHOTO_CONTENT.
Для других целей это приложение использоваться не будет.
You will receive an answer in about 3 days.
If you have not received the letter, check the application settings,
you may have already been granted permissions.
You can do this by following the link
and selecting the application you need.
To be able to send messages, your application must be External.
You can do this by adding a new platform with the "Add platform" button at the very bottom of the page.
Select the oAuth type, then fill in the settings section of the external application as in the screenshot.
This is how the screen will look after the OK.ru support team gives you permissions.
New fields GROUP_CONTENT and PHOTO_CONTENT will appear in the access
rights of your application.
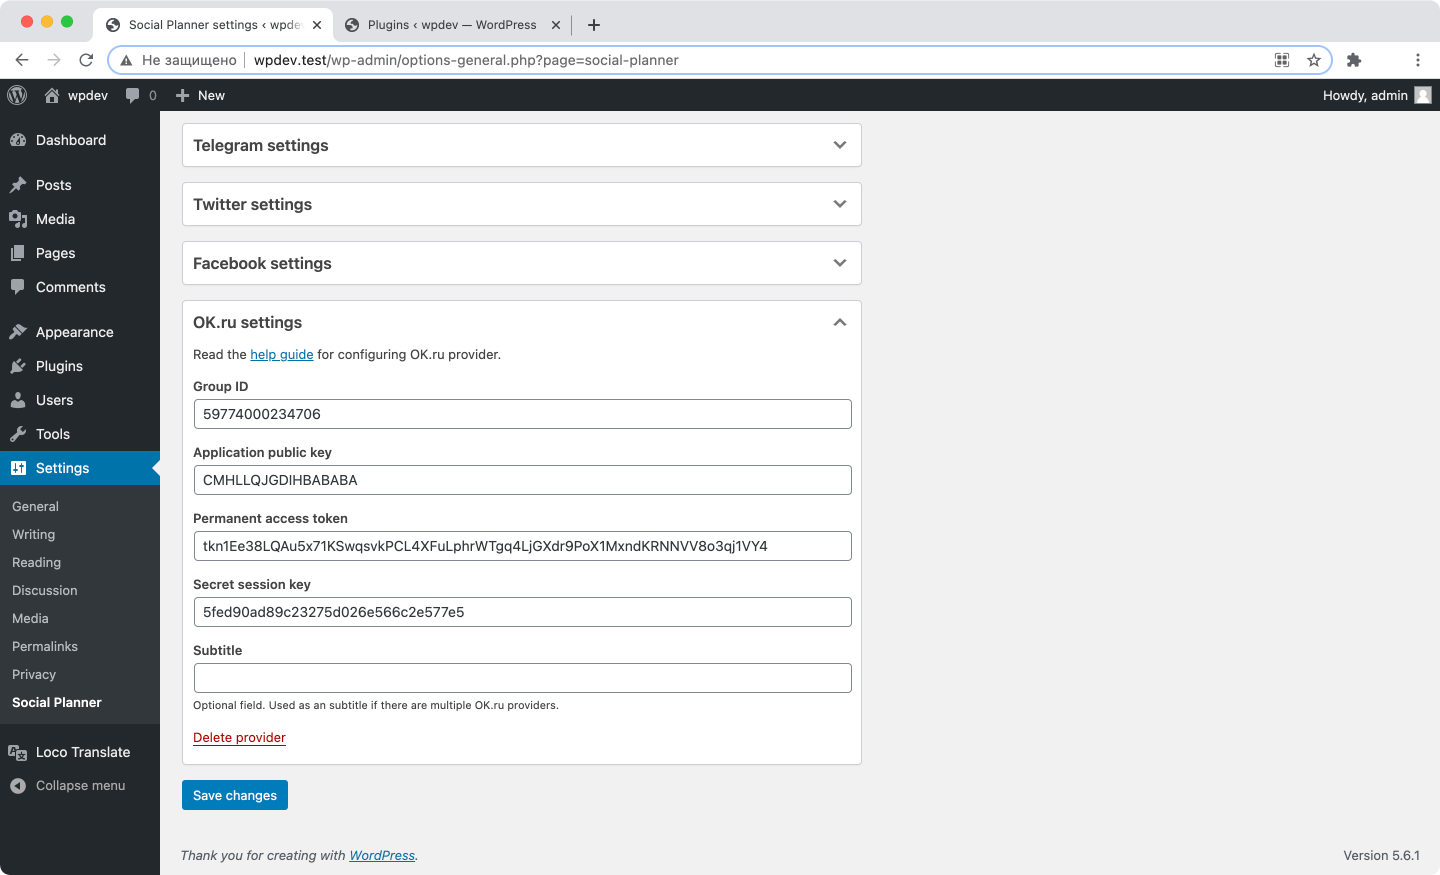
Now you can proceed to configuring the plugin. First of all, get an access token.
Copy both access token and secret session key to the plugin settings.
You can find the Application public key at the top of your app's settings page
or in the first letter from OK.ru support team.
The Group ID value can be viewed in the link address of your group or on its settings
page.
If you already have an authorization key and ability to publish to your Personal or Company Page,
you can immediately proceed to the configuring the plugin.
Attention! At the moment, the plugin does not allow you to receive keys automatically,
so the process may seem quite complicated. Perhaps in the future the possibility of authorization in a few clicks will be added.
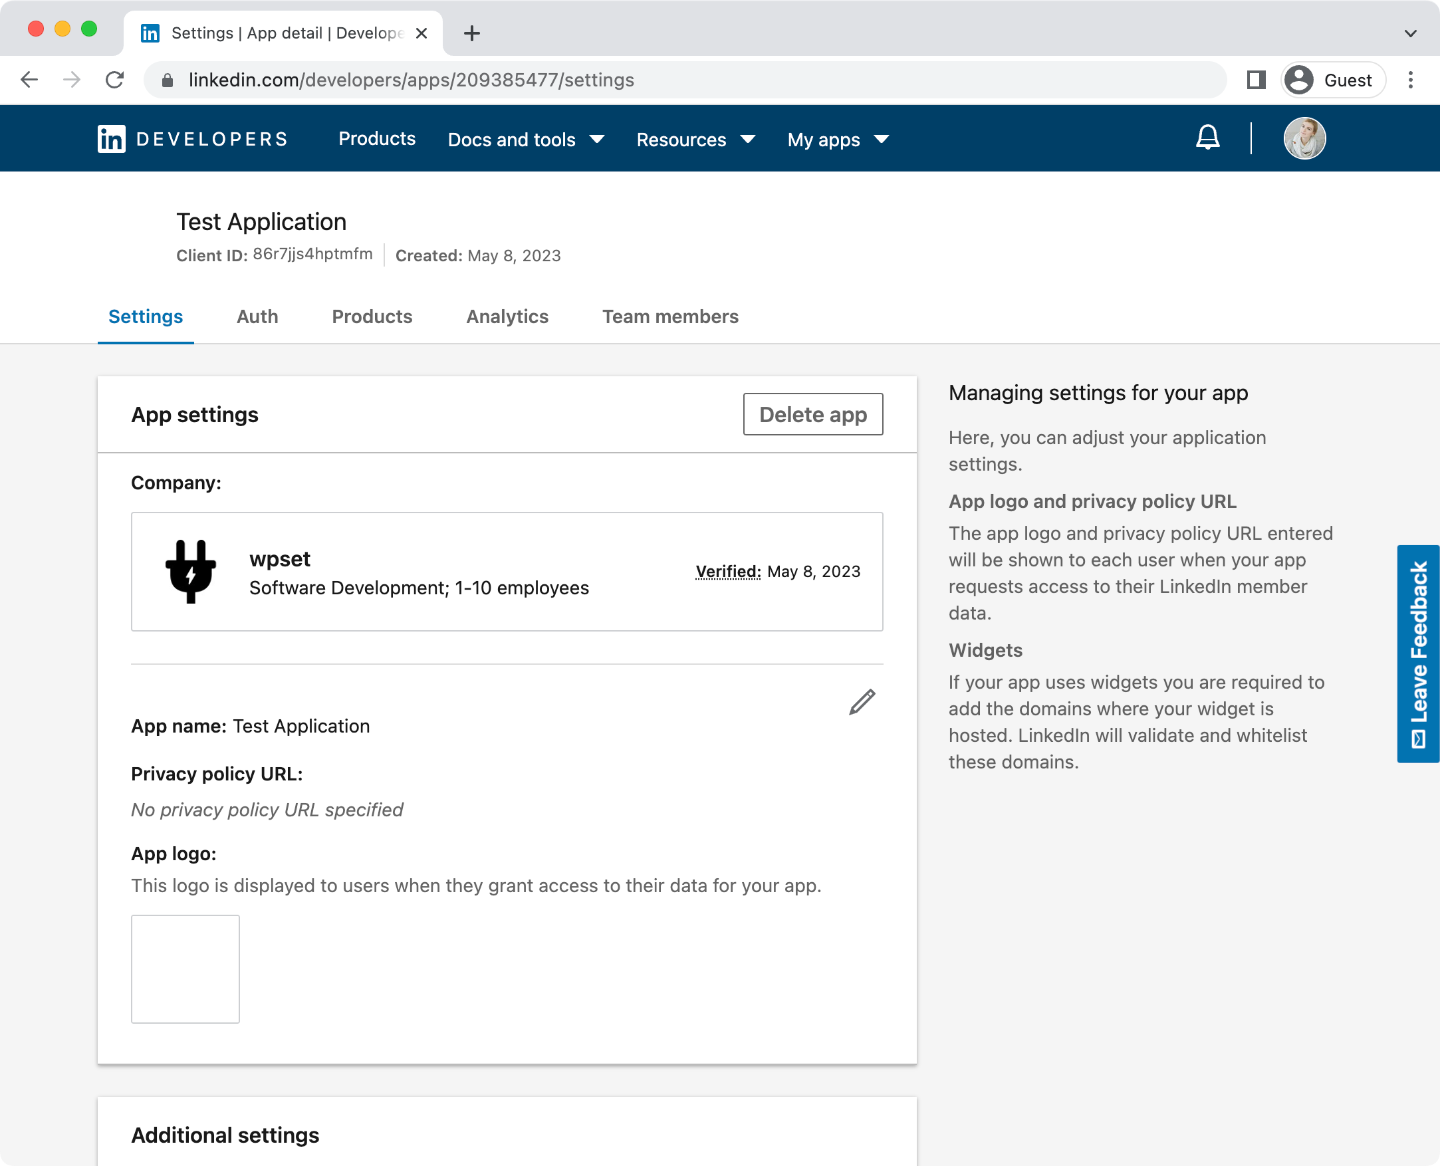
Attention! You can publish to LinkedIn Company Pages with the approved app only.
So you need to fill in a special form and request necessary permissions.
If you want to publish to your Personal page only, you can get keys without approving.
Log in to LinkedIn and go to the development page
for creating a new application.
Fill in the settings fields. Add app logo and connect with LinkedIn Page.
Each app must be associated with a Company Page, so you should create one if it doesn't exist.
Do not forget to associate your app with a Company Page.
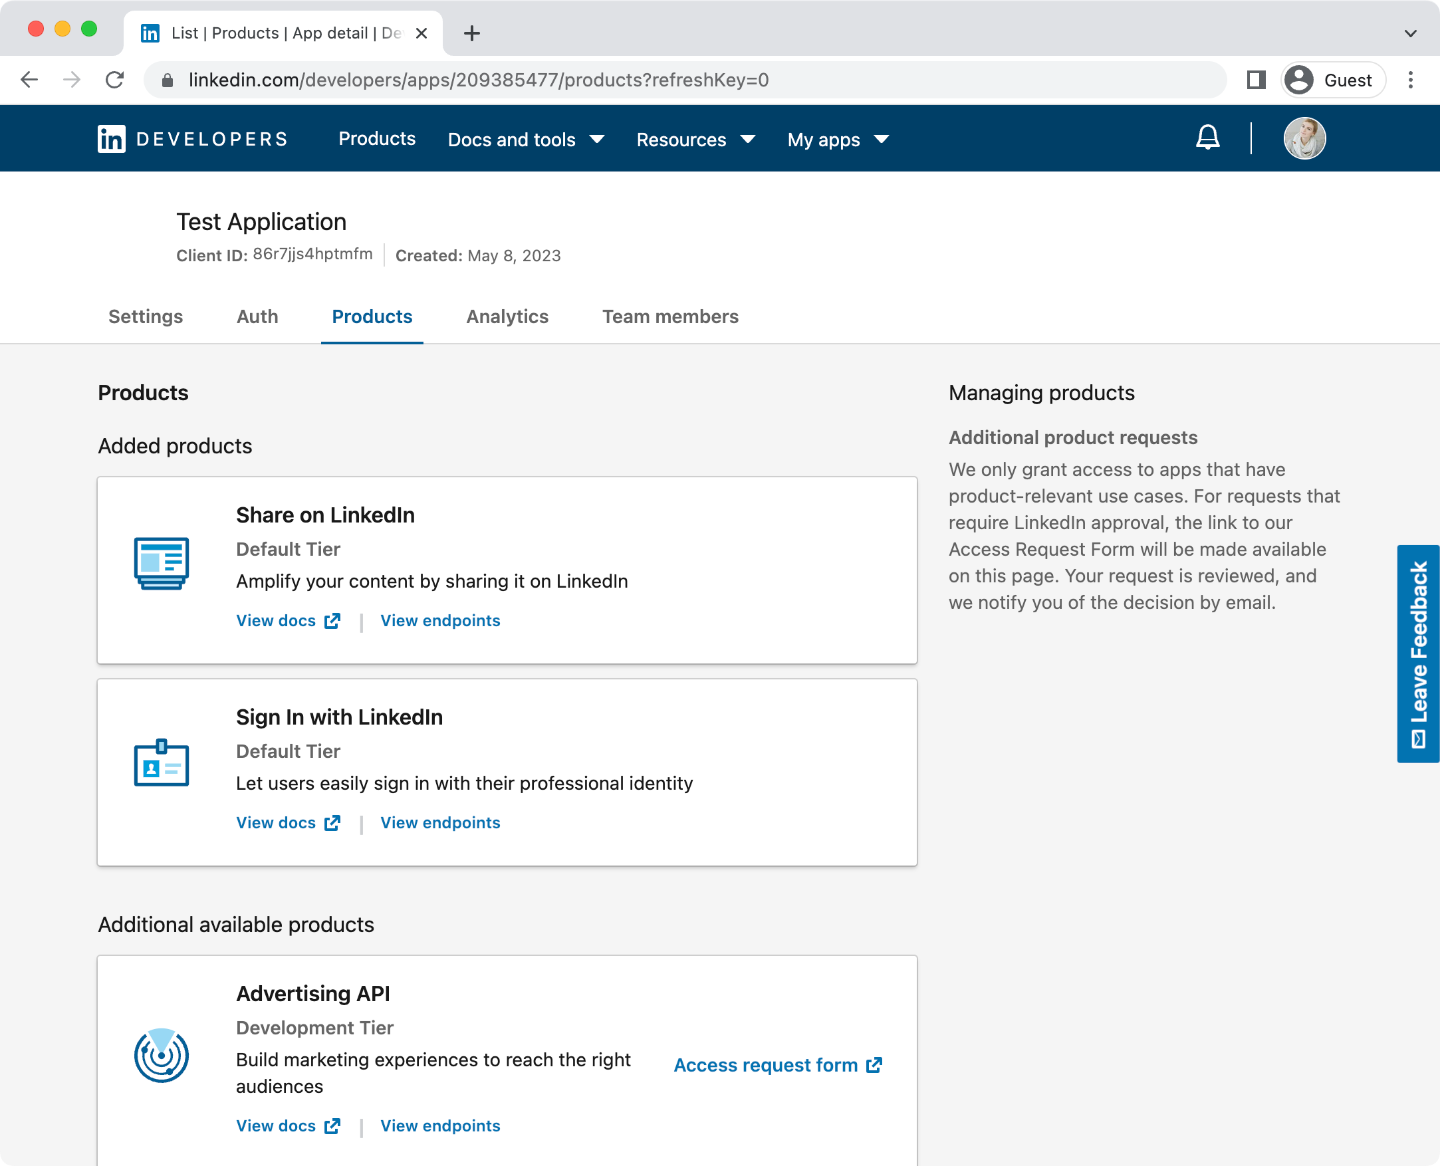
Now you should request access to application products. Choose Share on LinkedIn and Sign In with LinkedIn
if you need to share just to your Personal page. Add Advertising API to be able to post on your Company Page.
With these permissions you can publish only to your personal page.
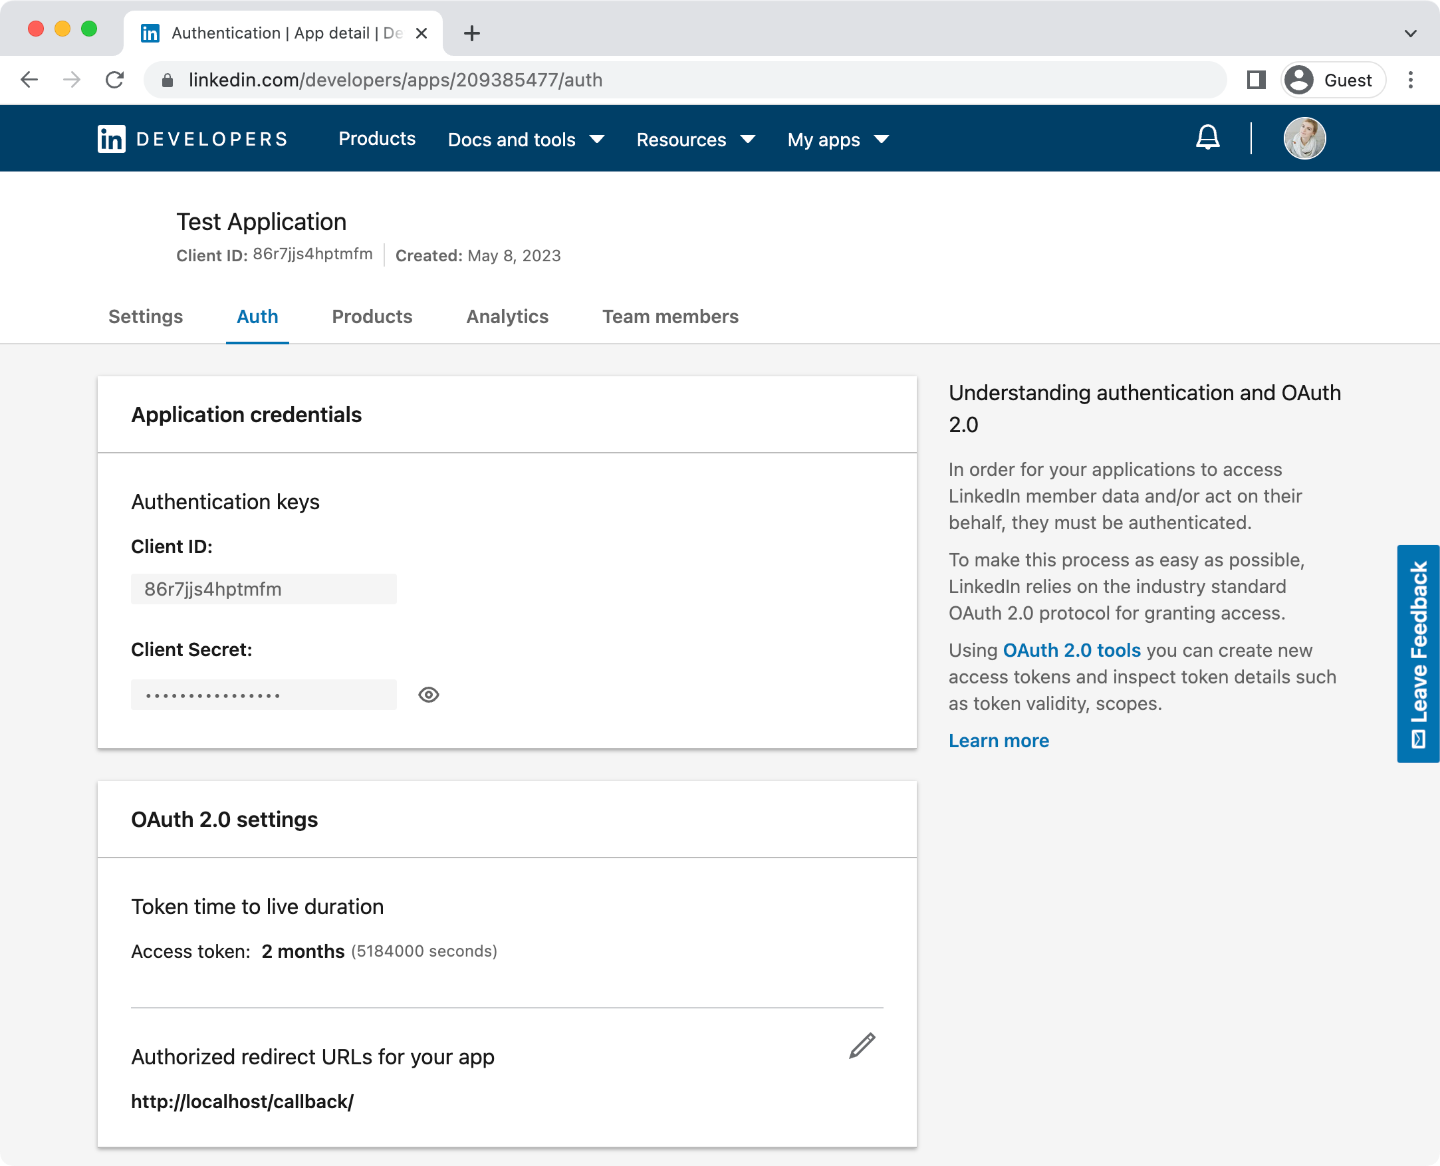
Add callback URL on Auth tab.
It's easiest to specify http://localhost/ address. After that you can get the key.
Create an URL using your own Client ID instead of {client_id} placeholder.
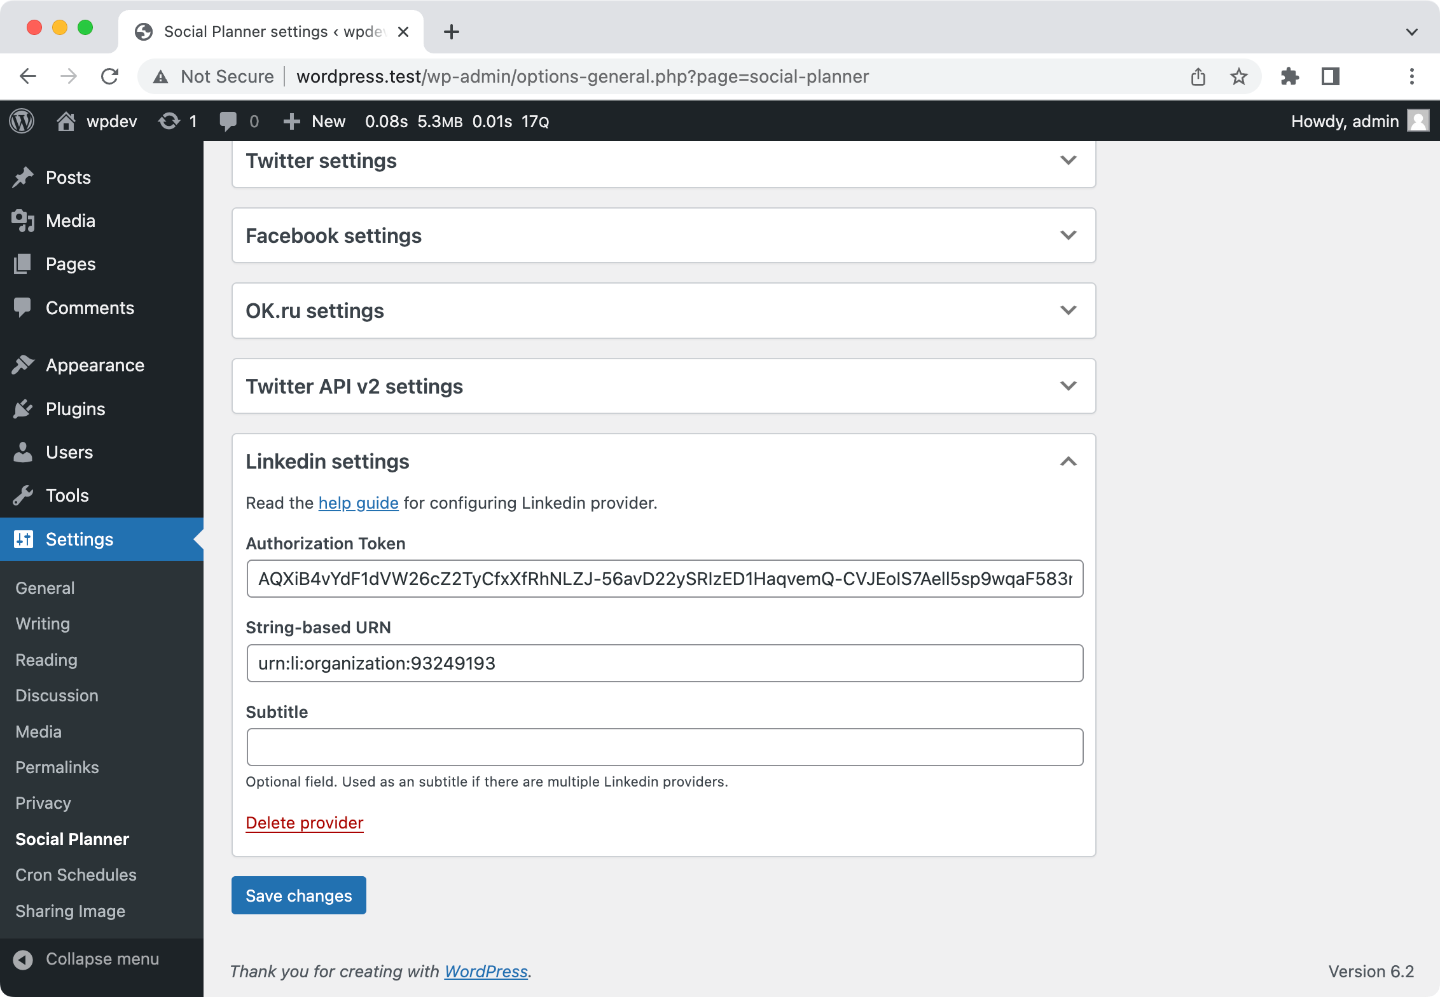
Get access_token field from the response. Great! Almost everything is ready to send messages.
If you want to post to your Personal page, you need to get its ID. Now it is possible to do this with your new key.
Send another request to the address below, using the access_token you received above.
Then generate your string-based URN. For example urn:li:person:Rr6NbIyGpX for a Personal Page and
urn:li:organization:93249193 for a Company Page. Get ID from page URL for organization URN.